

Jump to:
WEB INTERFACE TROUBLESHOOTING [opens new wiki page]
- Video Connection
- Audio Connection (How to connect a computer to the audio system)
- Routing and Decoder Settings (via web interface)
- Web interface won't load? troubleshooting instructions are HERE.
- Sample rate
- Input Ambisonic Format
- Ambisonic decoder
- Discrete channel routing (no decoder)
- Patching directly to speakers via the patch bay
- Auxiliary routing to your own speakers/devices
- Current System Settings, Gain, Stereo, Listening Diameter, Rotate
- Changing the Sample Rate, Decoder, Channel Routing, Room Correction
- Room Correction
- The TotalMix Routing Matrix
- Live Input / Recording
- Troubleshooting
- Detailed Routing and Boot Instructions [opens another wiki page]
- Reservation Calendar
Overview
Room 113 uses 10 full-range speakers and 1 subwoofer for with-height spatial sound reproduction. There is a routing decoding system to care of patching, ambisonic decoding, speaker balancing and room correction, and the crossovers for distributing sound to the subs. You can send a B-format signal to various decoders or address each speaker individually, depending on settings.
Audio Connection
- On either the Sound Lab Mac Mini or your own laptop, connect to the RME Fireface UX+ via the Thunderbolt 3 docking station (disconnect the TB3 cable from Mac Mini and connect it to your computer).
- If you don't have thunderbolt, you can connect to the Fireface via the USB cable connected to the Thunderbolt docking station. Please remember to restore this connection when you're finished.
- If you have a Thunderbolt 2-equipped computer, you can use a Thunderbolt 2 cable with Thunderbolt 3 adapter. The adapter will go on the side of the dock, replacing the cable going to Mac Mini. Please remember to restore this connection when you're finished.
- Is your computer not seeing the device? You need to download the driver for it HERE. This requires a reboot after installing.
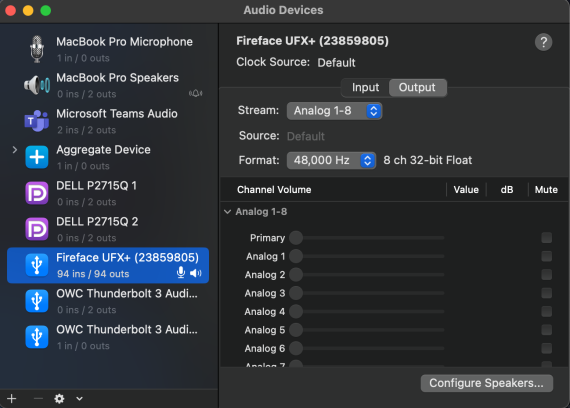
- In the Fireface Settings applet, make sure
- MADI Output is Mirror
- The Clock Source is Word Clock
- Word Clock I/O is not checked
- Confirm your Sample Rate


- In Audio MIDI Setup,
- Confirm that the Fireface’s Sample Rate matches that of the hardware in the rack.
- To change the sample rate, use the web interface, then confirm that the sample rate automatically updates in the Fireface Settings app. See sample rate instructions below for details.
- Make sure your system defaults to the Fireface UFX+ so Applications use it and SC will boot with that as its interface. Right-click Fireface UFX+ in the device list to change this setting.
- NOTE: you may want to set your “system sounds” to still play back to your Built-In Output.
- All sound goes through the Volume Knob in the gear rack (red knob), which is an active attenuator.
Audio sent from your machine will be routed/decoded in the room based on the router and decoder settings, detailed below.
Routing and Decoder Settings
From a web browser, go to dx113decoder.local:8080 (this is in the Chrome bookmark bar).
Current System Settings, Gain, Stereo, Listening Diameter, Rotate
Current System Settings are displayed on the left side of the page. Controls on the left side of the page can be updated in real-time (i.e. no need to select Apply to update the settings). These include:
- Gain (volume), Mute, Attenuate (reduce volume by 25dB) in realtime. Note: This is digital amplitude control, so an amplitude above 0dB may cause clipping in the hardware output stage.
- Listening Area Diameter can be set to accomodate a larger audience by increasing the diameter to the footprint of the group you have (within limits). Specifically, this sets the ambisonic decoder's crossover between "velocity" and "energy" decode.
- Stereo. When enabled, the first 2 channels of sound sent to the routing system will be automatically routed to the front left and right speakers. Any following channels will be sent to the decoding/routing system, i.e. the decoder input is offset by 2 channels on the input. When disabled, all audio channels are sent along to the decoder/router with no input channel offset.
- Rotate will rotate your soundfield decode so that the front is 90 degrees to the right.
Changing the Sample Rate, Decoder, Channel Routing, Room Correction
To change these settings, you must select the settings you want on the right half of the page and click Apply. You’ll see a readout of what’s happening in the Post window. Once updated the new settings will display in the yellow frame labeled Current System Settings.
Sample rate
The sample rate can be selected from the dropdown menu. Click "Apply" to change the sample rate. This will restart the routing system so the controls will go offline temporarily while the change takes effect. You can track the progress in the "Post" window. Once updated, you'll see the sample rate updated in the "Current System Settings" window.
IMPORTANT: Confirm that the sample rate has been updated in the Fireface USB Settings, changing it manually if necessary.Sometimes the Fireface USB is running at half of the appropriate sample rate, creating a doubling of channels. If you experience any problems, check that the sample rate matches between all the devices: the Web interface, Audio MIDI Setup, Fireface USB Settings applet, and the Big Ben in the gear rack (top unit).
Input Ambisonic Format
Here you can select what ambisonic input you are sending to the decoder. You can choose from "FuMa" (Furse-Malham), "AmbiX" (ACN SN3D), or "AtkHoa" (ACN N3D).
Ambisonic decoders
- Full_2D: 6-channel horizontal decoder, the oriented such that front is on the face of the hexagon.
- Full_3D: A dome decoder using 6 of the mid-height speakers, 3 elevation speakers, and the 1 uppermost speaker.
Remember: If “Stereo First” is enabled, decoder input channels are offset by 2 channels.
Discrete channel routing (no decoder)
There are different channel group presets that offer convenient routing to specific layouts, such as hex and quad layouts. The channel layouts are as follows:
- All: all channels in order (starting at front-left and working clockwise)
- Quad: [front-left, front-right, back-left, back-right]
- Hex_Vertex: [front-center, front-left, front-right, back-left, back-right, back-center]
- Hex_Flat: [front-left, front-right, mid-left, mid-right, back-left, back-right]
- Oct_Vertex: [front-center, front-left, front-right, mid-left, mid-right, back-left, back-right, back-center]
- Oct_Flat: [front-left, front-right, front-mid-left, front-mid-right, back-mid-left, back-mid-right, back-left, back-right]
Note: If “Stereo First” is enabled, direct speaker routing is offset by 2 channels.
Direct patching to speakers via the patch bay
Use the bottom row of the patch bay to connect directly to speakers. Channel order follows the Discrete routing order. Stereo Left and Right patch points are labeled.
Auxiliary routing to your own speakers/devices from system hardware
For the first 24 outputs from the system, you can connect a 1/4" TRS plug in the top row of the patch bay to intercept the audio being sent to that channel, pre-Gain knob, line level. Remember these are the direct speaker feeds, so any decoder/correction (filtering) settings are applied to the signal before being sent out– so you'll likely want to simply use Discrete routing and no room correction. Note that currently, the first 21 channels (speaker feeds) will always have some delay/gain compensation, even without using room correction, as part of the system's speaker balancing. This is very little from difference from channel to channel, but if this is undesireable, consider using channels above 21, which will roll over into the patchbay on top of the gear rack.
Room Correction
Room correction aligns all the speakers in time, matches loudness across the array, and adjusts the spectral coloration of each speaker to allow for more transparent listening into the soundfield. Note: As you make your setting selections, text below the setting controls will tell you whether or not your current selection has a filter match. You must select options until a match is found.
Selecting Balanced removes any corrective filtering and applies only amplitude and delay compensation to "balance and align" the speakers. Balanced should be considered a complete selection with no other correction options (i.e. The balanced button de-selects any filtering selections and vice versa).
The options in the dropdowns and check boxes apply equalizing filters which attempt to counteract coloration from the room acoustics. You must select at least an "amount" and a "phase" option (dropdown menus).
The "amount" setting refers to the amount (or agressiveness) of filtering applied. There are 3 options:
- OPEN - The most "passive" setting, which allows for more flexibility as to how close the listener needs to be to the sweet spot. The spectral correction (EQ curve) may be regarded as "least active" and “smoothest” as compared to the following settings. This is considered a default for general listening, especially with more than one person.
- MODERATE - This setting provides more "active" correction, with more spectral resolution in correcting the coloration of each speaker, also allowing more latitude in gain correction in each frequency band. This is for a more critical listening scenario where the listener is expected to be consistently in the middle of the array. While the soundfield “opens up” to provide more clarity in the sweet spot, there is more coloration of the sound for off-center listeners.
There are 2 phase options:
- Reference refers to the correction type which applies phase correction as well as magnitude correction, which is generally preferred for critical listening. Doing so improves transients, sharpens image clarity and deepens listening into the soundfield. However, correcting phase implies a slight delay in the sound. This is implemented using a linear phase filter.
- Realtime may be used, in situation when a delay is undesirable (e.g. for live/real-time uses). "Realtime" phase which introduces no delay in the signal, and is implemented via a minimum phase filter.
Further options are available depending on the room you're in. Select for the enviromental conditions of your listening setup. For example, check "desk" if you're in the listening position using the desk. The room correction will account for these acoustics-altering room features.
Click "Apply" for the changes to take effect.
The TotalMix Routing Matrix
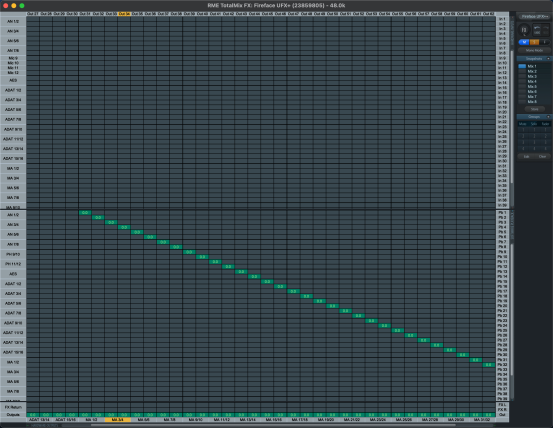
The default Routing Matrix configuration is stored in Fireface Mixer' TotalMix Preset 1 on the 113 user machine. If you are using your own machine, you will need to implement those settings yourself.
The digital routing forwards the system output channel 1->32 to outputs 31->62 (MADI). This is because the primary connection to the decoding system is via MADI, and the MADI outputs on the Fireface start at channel 31. The default configuration will forward the first bank of outputs to the MADI ports, so you can just send sound out of channel 1 (or 0 if using SC), and it will go to the right place. Normally the first outputs of the Fireface UFX+ are the analog outputs, but in 113 the analog outputs are not connected to anything. This is important to know if your audio software addresses the hardware ports directly by format. For example, Reaper will list MADI 1 as an option for a hardware output (instead of the hardware out channel, which is 13).
Here's what the Fireface Mixer Matrix should look like:
Live Input / Recording
- Use the inputs/preamps on Fireface UFX+ rack unit.
- Because you're already connected directly to this interface, you use the inputs as you would any other audio interface.
- Note: the 4 preamp channels are inputs 9-12 on the Fireface UFX+.
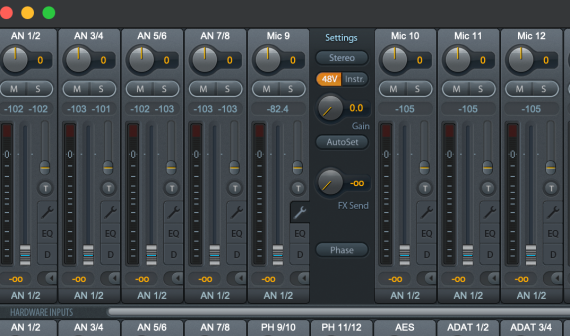
Phantom power
- Then use the Totalmix to turn phantom power on for microphones that require it.
- Switch Totalmix to the mixer view. At the top are hardware inputs. Mic's 9-12 have phantom power capabilities.
- Click the settings button for the desired channel (looks like a wrench).
- Click the 48V button.
- Note:Please turn off phantom power when you're done.
Video Connection
Overview
Video, like audio is connected through the Thunderbolt 3 dock. The Mac Mini that is the user machine in 113 connects to the dock with a single Thunderbolt 3 cable. Both displays are connected through DisplayPort directly to the dock. (Note: This has changed in the Spring of 2019. The HDMI connection is no longer used. Switching inputs on the monitors is no longer needed.)
Connecting your laptop
Jump to the instruction for the type of Thunderbolt connection your laptop uses:
Thunderbolt 3
(recommended)
- Carefully disconnect the Thunderbolt 3 cable from the Mac Mini.
- Connect the Thunderbolt 3 cable to your laptop. You should get a video connection to one video monitor, as well as the RME Settings applet (assuming you've installed the drivers).
- NOTE: Be sure to confirm that the lights on the ethernet port on the dock are illuminated. This indicates you have a network connection to the routing system. If they're not illuminated, you may need to disconnect this network cable and reconnect it, at which point the socket lights should illuminate.
- Please reconnect the Thunderbolt 3 cable when you're finished.
Thunderbolt 2
- Carefully disconnect the Thunderbolt 3 cable from the dock.
- Find the unconnected Thunderbolt 2 cable (should be next to the user machine) with Thunderbolt 3 adapter attached.
- Connect the Thunderbolt 3 adapter to the dock and the Thunderbolt 2 cable to your laptop. You should get a video connection to one video monitor, as well as the RME Settings applet (assuming you've installed the drivers).
- NOTE: Be sure to confirm that the lights on the ethernet port on the dock are illuminated. This indicates you have a network connection to the routing system. If they're not illuminated, you may need to disconnect this network cable and reconnect it, at which point the socket lights should illuminate.
- Due to technical limitations, Thunderbolt 2 connection will only drive one of the connected monitors, since they operate at 4k resolution. In order to use the second monitor with your laptop:
- Carefully disconnect the MiniDisplayPort cable from the dock.
- Connect the cable to your laptop.
- That should get you connected to both displays. Disconnecting the cable from the dock will likely result in your laptop switching from displaying on the top monitor to the bottom one.
- After connecting the mDP cable to your computer, you should get the image on both displays, as long as your laptop is capable of driving them at the same time.
- Please reconnect the cables when you're finished, including the Thunderbolt 3 and MiniDisplayPort connections.
- The Thunderbolt 2 connection should work on 2013-2015 MacBookPro models
- The 13" model is able to drive both displays at full resolution but 30Hz refresh rate
- The 15" model is able to drive both displays at full resolution and 60Hz refresh rate
Troubleshooting
- Sound is coming out of the wrong channels.
- No sound!
- The sound image of my ambisonic material sounds odd, skewed or otherwise not correct.
- There are intermittent crackles/distortion in my sound.
- Sound is quiet with the Volume knob cranked up.
( Detailed Routing and Boot Instructions [opens another wiki page] )
Problem: Sound is coming out of the wrong channels.
- Check your Stereo setting. Remember this offsets your audio routing/decoding by 2 channels because the first 2 channels you send are assumed to be a stereo signal.
- Check your Decoder settings, especially if you're using a discrete routing– in some rooms there are multiple discrete routing options which send to specific, non-contiguous channels.
- Check that the sample rate matches between all the devices: the Web interface, Audio MIDI Setup, and Fireface Settings applet. Sometimes the Fireface is running at half of the appropriate sample rate, creating a doubling of channels.
- Confirm that the web interface and Fireface Settings sample rate match.
- Double check the Gain fader, Mute, and Attenuation button settings in the web interface.
- Check the physical volume knob.
- Still having trouble? If there is a room correction kernel running, you may need to switch the room correction setting to “basic_balance”, then back to your desired correction settings. Sometimes the correction process fails and needs to be reset.
Problem: The sound image of my ambisonic material sounds odd, skewed or otherwise not correct.
- In the Web interface, double-check the Stereo setting is what you expect. Remember when Stereo is active, the first 2 channels you send the routing system are routed to the stereo speakers, and following channels are sent to the decoding/routing scheme you’ve selected. When Stereo is off, your output is sent straight to the decoder/router with no channel offset.
- Confrim the Fireface Settings sample rate matches the web interface sample rate. If there is a mismatch, some channels may be doubled, which will sound like an incorrect decode of ambisonic material.
- If you're still having trouble, you can look in the Fireface Mixer, go to the Matrix View (from the menu to type 'x'). Confirm there are no errant routing selections.
Problem: There are intermittent crackles/distortion in my sound.
- Check that your sample rates match across all devices and applications: the Web interface, Audio MIDI Setup, and the Fireface Settings applet. In Fireface Settings applet, confirm the Preferred Sync Ref is Word Clock and the System Clock>Mode is Slave.
- Check the Web interface to make sure you’re not boosting the signal digitally in the amplitude slider more than expected. This may clip your sound at the hardware output before the physical volume knob.
- Make sure you have the latest interface drivers for the Fireface USB. The driver version shows in the Fireface USB Settings applet. You can download the latest from the RME downloads site.
Problem: Sound is quiet with the Volume knob cranked up.
- Confirm your source application is turned up to the right level. Check that you haven't unintentionally selected Attenuate (or Mute) on the web interface. If your source is quiet, you can turn up the router/decoder on the web interface by 12 dB. Remember to set it back to 0dB when you’re done.
Reservation Calendar
This calendar shows both Raitt 117 (blue) and 113 (yellow).