Laser Cutter Overview
You’ll be working at the computer located next to the laser cutter. First you’ll work in Rhino, creating or modifying the curves that will control the laser. In Rhino, you’ll print to software called Universal Laser Systems Control Panel (UCP). In UCP, you’ll position your curves relative to the material being cut, and you’ll set some parameters to control the laser cutting.
Preparing Your File and Exporting from Rhino
Open your file in Rhino or start a new file. Rhino’s Top view is the only one you’ll need. Draw your curves using these RGB colors, depending on what you want the laser to do:
RED = cut the material.
BLACK = engrave the surface with a raster.
BLUE = score (mark) the surface using vectors.

Print to Universal Laser Systems Control Panel
In Rhino, go to File > Print or press Ctrl + P. Then click on the Print icon at the lower right of the screen. Then start UCP by clicking on the red diamond-shaped icon in the taskbar at the lower right of the screen.
In UCP, click the Settings button at lower right.
Measure the thickness of your material using calipers.
On the Materials Database tab, set the material type and thickness, using the correct Units setting. If you do not set these correctly, the laser power will be set too low, and the cut will not go through the material, or the power will be set too high, and you’ll burn the material.
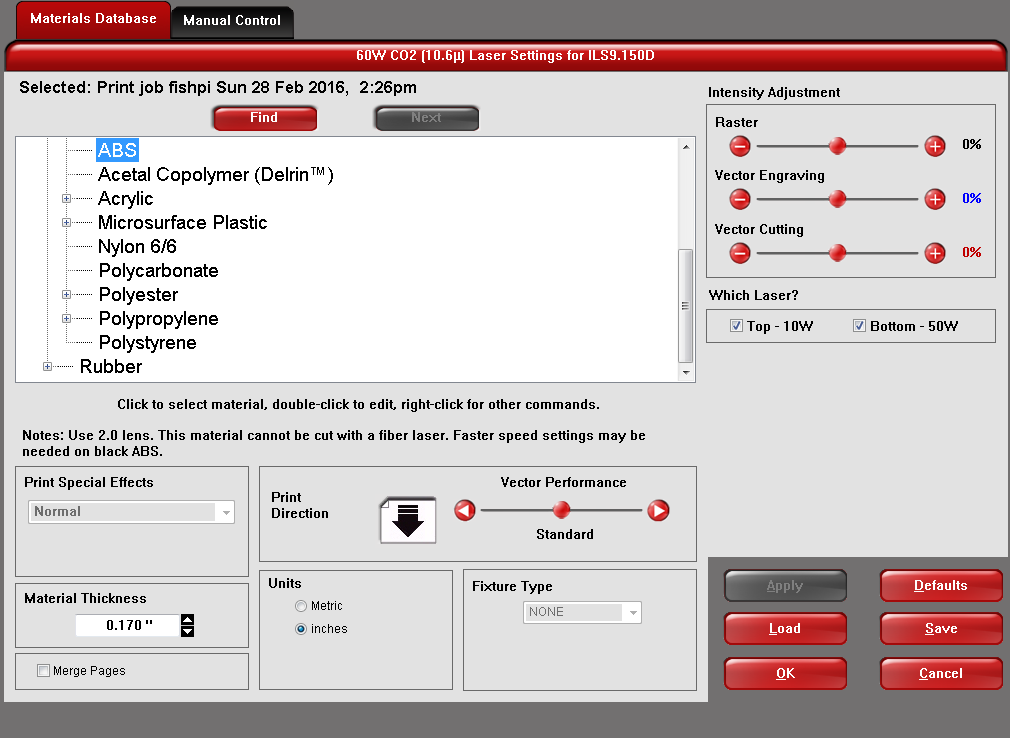
There's no need to change anything else on this tab or on the Manual Control tab.
Click on OK.
Open laser cutter cover and place your material centered against the back edge. Leave the cover open.
Turn On the Laser Cutter
-
Turn on the wall switch labeled “laser”.
-
Turn the laser cutter’s switch on.
-
Turn on the compressor air drier using the green switch.
-
Turn the red handle on the air compressor control valve to line up with hose; check the gauge to the left.
-
Turn on the wall switch labeled “fan”.
-
Check to be sure air is coming out of the nozzle located inside the laser cutter, at the back right, below the red rectangle labeled “2.0”.
Position Your Curves to Print at the Right Location
On the UCP screen, you’ll see your curves on the left and these control buttons on the right:
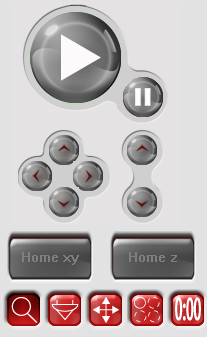

: Pause Print
: Zoom
: Focus View
: Move print object
: Make copies of print object
: Estimate time to complete print
Press the Move print object button, and drag your curves to correspond to the position of your material (centered at the back edge).
Next, use the Focus view button to mark the outermost edges of your curves. Here’s the procedure:
Click on the Focus view button, and mark an edge of your curve. Look at your material inside the laser cutter, and see where the red laser is shining. Adjust the material or your curves as needed. Repeat for the other edges.
When you’re done with positioning, close the cover and start the laser cutter by pressing the Play button. If you have any problems, just open the cover.
When the job is finished, remove the material and close the cover.
Turn Off the Laser Cutter
-
Turn off the wall switch labeled “fan”.
-
Turn the red handle on the air compressor control valve so that it’s at right angles to the hose.
-
Turn off the compressor air drier using the green switch.
-
Turn the laser cutter’s switch off.
-
Turn off the wall switch labeled “laser”.