Sparkfun BTM-182
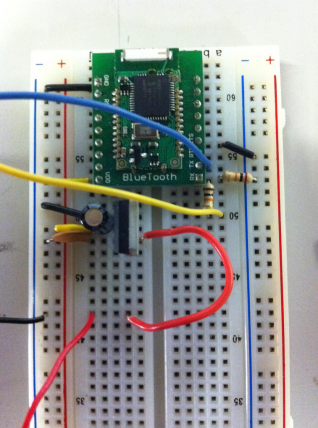
(Click on the image to go to Flickr and see the annotations including resistor values and pin numbers!)
Wiring
- // -BT VCC connected to 3.3V on Arduino
- // -BT GND conected to GND on Arduino.
- // -Arduino TX (pin 1) is connected by 20K to GND and 10K to BlueTooth RX.
- // -Arduino RX (pin 0) connected to BlueTooth TX
- // -LED connected to pin 9 on Arduino with 220 resistor
- RX and TX are labelled on the bottom, Pin 5 and Pin 6 respectively (counting up from the lower left in the image above).
- Note on TX/RX:
- The Arduino TX (pin 1) connects to BTM-182 RX (pin 5). Likewise, Arduino RX (pin 0) connects to BTM-182 TX (pin 6). One is transmitting for the other to receive. And vice-versa.
- Note on Voltage Levels:
- The BTM-182 is a 3.3V chip. We cannot directly connect digital outputs from the Arduino to it. This is why we are using 20K and 10K resistor on the Arduino TX to BTM RX. This is a voltage divider "stepping-down" the Arduino logic level to 3.3V. In the above image, the 10K Arduino TX and BTM RX in combination with the 20K from that pin to GND cuts the voltage by 2/3.
- See Software Setup below to test it out.
Software
- Wire up the circuit above but leave the RX and TX pins (blue and yellow above) unconnected.
- Add the BTM-182 as a new Bluetooth device on your computer. In OS X:
- Open System Preferences -> Bluetooth -> Setup New Device.
- The BTM-182 shows up as "Serial Adaptor". Select the device and click Continue.
- Go through the pairing process. For the BTM-182 use 1234 as your passkey.
- Upload the program to the Arduino.
- Connect RX and TX (your arduino with bluetooth is ready to go)
- Modify the Processing sketch to open the appropriate Serial Device (ex. "/dev/tty.SerialAdaptor-DevB")
- Run the Processing sketch!
- You should see a "Sent". "Received" message printing in the console window, and the LED should slowly step up in brightness.
- Note on Passkeys:
- Try 1234 as your passkey. If you are not able to pair with the device, try 0000 instead. The different modules seem to have different passkeys.
- Note on Baud Rates:
- Try 9600 baud for serial setup in Processing and Arduino originally. If this doesn't work, try 19200. There seems to be some default value and some confusion here. Hopefully 9600 works.
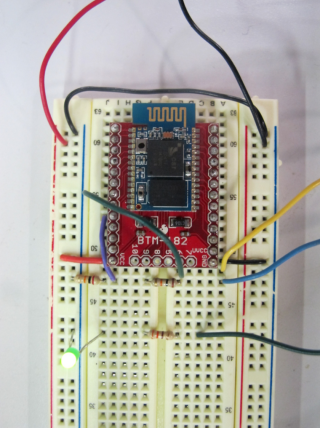
Older Sparkfun BT Module
similar setup...