- Basics
- Hardware Output Routing
- Track Routing, Channel Count, Sends, Receives
- Mixer Track Layouts and Metering
- Folders
- Decoder Tracks
- Rendering your mix
- Plugin routing
- Tips and Tricks
Basics
Some of the first things you'll want to set are:
- Right click the timeline "ruler" above the track window and select the time notations you want. Probably Minutes:Seconds
- See Menu>Options>Snap/grid to en/disable the grid display or snapping, or set more advanced snap and grid settings in the Snap/Grid settings... dialog
- Select Menu>Track>Insert New Track, or Command+T to add your first track and begin setting up your channel count and routing.
Hardware Output Routing
Next, you'll need to get audio routed to your hardware. There are a couple different approaches to to sending your mix (decode) out to your speakers:
- A typical strategy is to mix through the Master track to route your output mix (decode) to your speakers or headphones; Reaper is arranged to support this paradigm.
- *Recommended* Individual tracks and Folder tracks have the advantage of a bit more routing flexibility and, importantly, rendering flexibility for high channel counts. (More on this in Folders and Decoder Tracks below.)
Whether you're using the Master track, a Folder track or normal tracks to audition submixes or various decodes, the routing setup is the same:
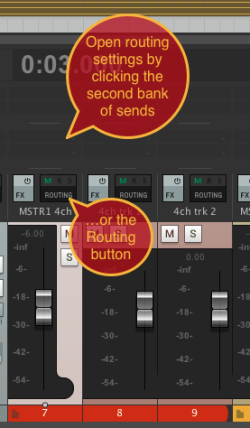
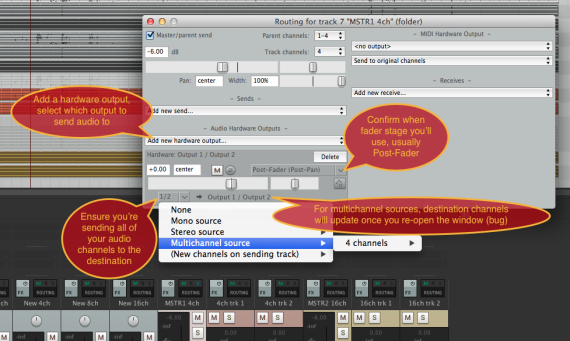
A dialog will open with various track settings, but for hardware setting, just look at the lower left dropdown. You can add multiple hardware sends, adjust their send levels, mute them, and delete them. Be sure to check that you're sending all of your track channels to your hardware. You can also send a subset of the channels to the hardware. See the dropdown menu in the image:
Track Routing, Channel Count, Sends, Receives
You'll notice from the above image that the Routing window exposes various additional track controls, including:
- Master/parent send: Dis/Enables through routing to the Master track, or Folder track in the case that the track is in a folder.
- Track Volume: Convenient for setting a specific dB value, instead of just using the track fader.
- Panning/Width values: Best not to use these for multichannel audio
- Sends to other tracks: Send the output from this track to other tracks, Pre- or Post-fader, Pre- or Post-FX, with independent send level to each send.
- Receives from other tracks: Displays what other tracks are being sent to the present track. You can modify the receive settings, which in turn modify the send settings from the source track. Adding a receive to a target track is identical to adding the send to the source track.
- Hardware Outputs: Send audio for this track directly out to specific hardware channels, with the same controls as a track send.
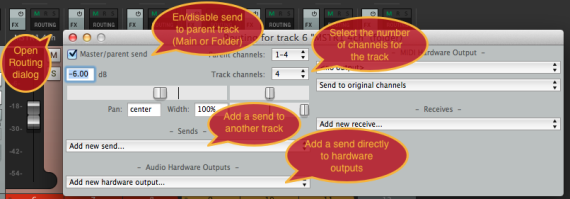
After enabling your the correct number of Track channels, play your audio to make sure you see the correct number of audio channels metered in your track. If not, check that your track routing settings specify the correct number of channels (see Track Routing).
Mixer Track Layouts and Metering
The default Mixer track layouts aren't very well suited for monitoring multichannel audio. And for multichannel mixing projects, there are a number of controls that aren't needed, such as phase, panning, trim, input routing, and record controls. We have specifically designed Mixer track layouts that you may find useful for multichannel mixing...
These layouts are available in the MultiChanMix theme, which you can download here.
This is the same as the default theme, but with these extra track layout options added. If you're not already on the MultiChanMix theme, switch to that theme:
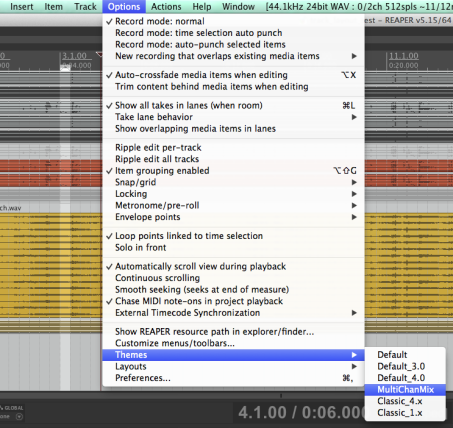
Now that you have the right theme (this will persist through Reaper restarts), right-click on a track—or select multiple tracks to change a group of tracks—then right-click, select Set Track Layout>Mixer Panel>MultiChan Mix - *. * will be either:
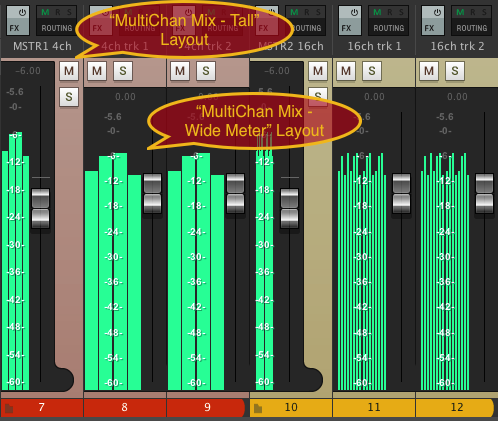
- Tall: similar to the default track layout, with unnecessary controls stripped out and a taller level meter, or
- Wide Meter: meters made as wide as possible for viewing many channels in a track

This example shows 2 Folder track structures, one with a 4-channel signal path, another with a 16-channel signal path. Note the visibility of individual channel levels:
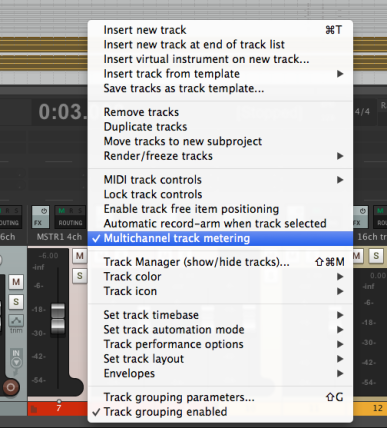
Play your audio to make sure you see the correct number of audio channels metered in your track. If not, check that your track routing settings specify the correct number of channels (see Track Routing). Also, check that Multichannel metering is enabled on your track by right-clicking on the track (not the level meter itself), and select Multichannel track metering:
Folders
Notice that the above image shows tracks that are colorized and utilize two different track Layout styles. The Layouts and colors help to clarify the Folder structure of the mixing session.
What are Folders?
Folders are useful for routing multichannel tracks to a shared track, similar to a buss or the master track. A Folder is a track, but with some helpful differences. A Folder track is conceptually like a parent track, and the tracks "in" that Folder are like children:
- The output of the children (post-FX) is automatically routed (summed) through the Folder, and not sent the Master track
- When Muting, or Soloing the Folder track, the children are Muted/Soloed
- The Volume fader of the Folder track acts as a master volume for the mix of the children
Just like a regular track, the Folder track can contain an FX chain, can be routed to other tracks, or to hardware outputs.
Setting up Folders
To create a folder, a track is selected as the Folder track, then one or more following (consecutive!) tracks are routed through that track. To do this:
- Mouse over the folder icon of the track to enable as a Folder, the icon becomes a ‘+’, then click to enable. Every track after that is now "in" (routed through) that Folder track.
- To select the last "child" track in the folder, click the folder icon of the last track to include in the folder, until the icon is an ‘X’ (twice), then click again to complete the Folder boundary. Any tracks after that retain their former folder/session structure.

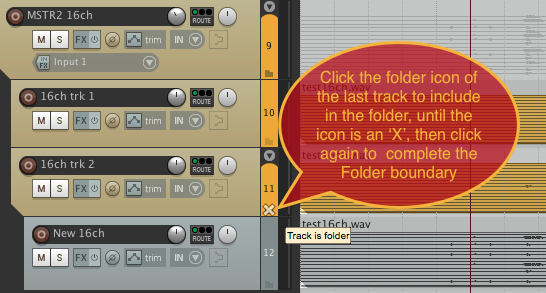
In the Track Panel, child tracks are indented below the Folder track. You can expand and collapse the children tracks with the little triangle at the top right of the Folder track's control panel:
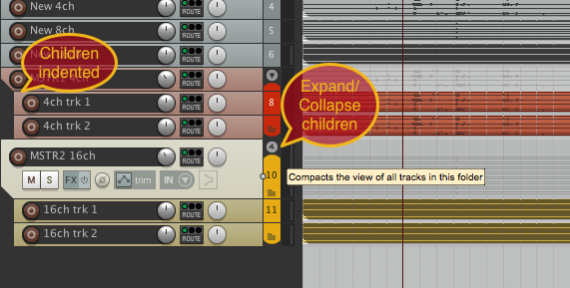
In the Mixer Panel, the folders are denoted with a folder icon, and the last child has a rounded edge to the track number label:
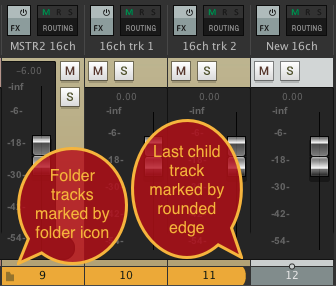
Also note that a waveform is rendered on the Folder track's timeline, which is a display of the summed children tracks.
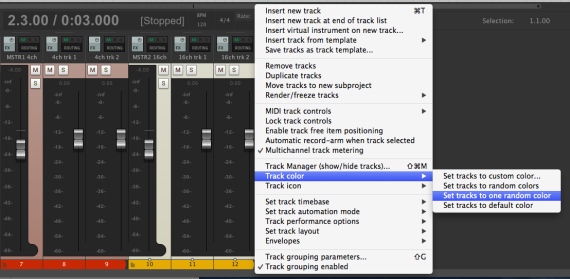
Finally, it's useful to set a Folder track and it's children to a unique color—Select one or more tracks, right click to colorize:
...as well as set the Folder tracks to a different Layout style than their children, which makes them appear grouped visually:
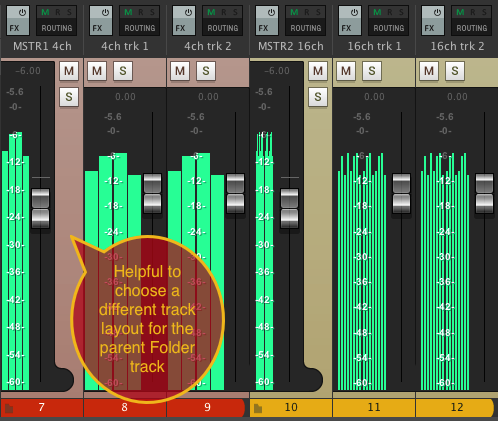
Mixing through Folders (Parent) Tracks
You can use Folders as groups for submixes of instruments. A simple example would be to use a Folder for a sub mix of a drumset, which uses many mics, each with separate effects, and the Folder volume gives you Volume, Mute and Solo control over the drum mix. You could put a compressor on the full drum mix by placing the effect on the Folder track.
You can use Folders as busses for multichannel audio to capture, for example, all Third Order Ambisonic material before routing a folder to different decoder tracks (like a UHJ, or 7.1, or speaker array decoder). You can then monitor and render stems from the Folder tracks for different output formats, such as native TOA, stereo, and 7.1, all independently of one another.
Folders can be nested in other folders, in which case the nested folders are the topmost folder's children.
An example of a nested folder might be:
- 4 mono microphones capture instruments in a space, while an Eigenmike captures the full scene.
- The 4 mono microphone tracks have TOA encoders in the FX chain, and so output TOA signals. They are placed "in" a 16-channel Folder track called "Mics" so their outputs are all summed into that Folder track.
- The Eigenmike is its own 16-channel track
- An effect track is added that has a TOA Reverb in its FX chain.
- A send is added on the "Mics" Folder track to the Reveb Track for independent control over the amount sent to the reverb.
- The "Mics" Folder track (with it's children mic tracks), Eigenmike track, and Reverb track are placed "in" another Folder that is the "TOA Master" Folder. All child tracks and folders are therefore summed into the "TOA Master" Folder track.
- "TOA Master" Folder track can ...
- then be routed directly out to hardware for auditioning through an outboard decoder, and/or
- have a decoder plugin added to the track to decode the TOA mix in the track itself, and/or
- send to one or more other tracks which may have various decoder plugins in their FX chain. Continue reading the next section for more information about decoder tracks.
Decoder Tracks
As mentioned in the previous section, it can be convenient to have multiple decoders in your session, each on their own tracks.
If your FOA or HOA mix is bussed through a "B-format Master" Folder track, you can add track sends from this Folder track to one or more tracks that have decoders in their FX chain. This has many advantages:
- These decoder tracks would send to the hardware outputs according to their type of decoding. For example,
- a UHJ decode may be set to stereo speakers
- an HRTF decode may be sent to headphone outputs from the audio interface
- a 5.1 decode may get sent to a 5.1 surround system
- the TOA mix may be sent to a dedicated decoding system run on another computer or piece of hardware
- Each decoder track could be muted, solo'ed, and have levels adjusted independently.
- Additionally, each decoder track can be selected for (stem) rendering to a desired output format, without changing the core routing setup of the session. Read on for instrunctions on how to render your mix.
Rendering your mix
You may want to render your b-format mix into various formats, say, native FOA/HOA, Stereo UHJ, and an HRTF decode for headphone playback. If you've used decoder tracks, as described in the previous section, you'll want to create Stem Renders for each of your decoders.
Note: if you're using the Master track to mix and render your session, you can only render up to 8 tracks. For rendering higher channel counts, you'll need to use a regular track as your master (most easily a Folder track, as discussed throughout this tutorial), and do a Stem render of that track.
Before rendering, confirm that you have all of your track and channel routing correct, plugins enabled or disabled as needed in your final mix, check that your tracks are not clipping, and that you're running at the sample rate you expect for your final mix (if you don't plan to re-sample in the rendering process).
Select the track you want to render, then choose Menu>File>Render... or Option+r to open the rendering dialog. The first option is Sources, which, for the decoder track mixing method we're using, you'll want to select Stems (Selected tracks). In the following dropdown, you'll select the bounds you'd like to render. If you've selected a region in the timeline, you could render just that Time Selection, or the entire project (up to the last bit of audio data), a custom start and end point, etc. Note the Tail option, to add time at the end of your render bounds, in for example there may be a plugin's reverb tail to account for.

The file render path is straightforward, and also provides options such as wildcard names in the case that you're rendering multiple tracks/stems at once.
Confirm your sample rate settings. If you'll be resampling, you can choose various resampling modes and you have the option to add dither and noise shaping in the case of resampling and bit resolution changes.
Important: If you're rendering a multichannel track (stem), check Multichannel tracks to multichannel files. This ensures you'll render all of your channels. In this case the selection in the Channels dropdown is overridden (this pertains only to the Master track).
Choose your file format and bit depth. Note that if you have a long project with a high channel count, you can select a Large files option to best suit what you'd like to do in the case that you'll have a file size that exceeds the WAV file format (4GB).
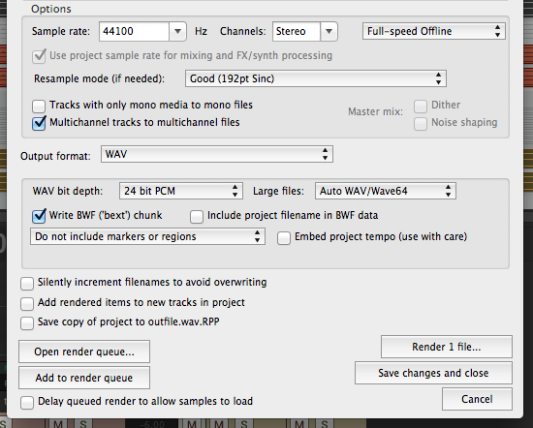
Lastly, you can either render the project file(s) immediately, or add to a render queue, in which case you can return to your session to make edits to the project to render with different mix settings, etc, add that state to the render queue, open another session, add that to the render queue, etc. and render all of these in one go later, while you get some coffee.
Plugin routing
Multichannel plugins require some attention to how they are routed in Reaper.
Plugins specify their own channel counts, both inputs and outputs. When you add a plugin to your track, you want to make sure that your track has as many channels as your plugin uses. For example an FOA stereo decoder plugin may define four inputs (FOA signal) and just two outputs (Stereo decoded signal). Similarly, an FOA planewave encoder plugin may specify one input (mono audio) and 4 outputs (FOA signal). In both cases, your track needs to have at least as many channels as the maximum number of input or output channels in your plugins—four in the case of both examples mentioned. Add a plugin to your track, open its interface window, and nore a button at the top righ that says "X in X out". This shows the number of ins and outs specified by the plugin.
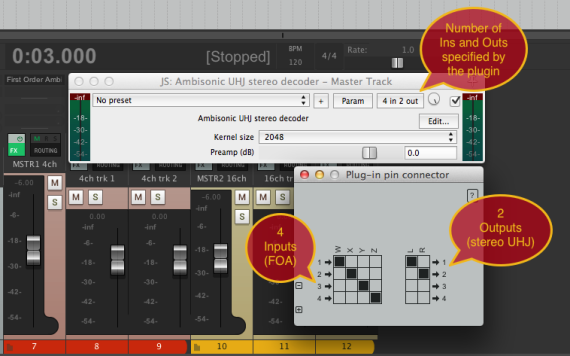
If you click on this button, a "Plug-in pin connector" (routing matrix) window will open (above), showing how audio is routed from the track (numbers on the left, 1-4) into the plugin (letters on the top row, left matrix, W, X, Y, Z), out of the plugin (letters on the top row, right matrix, L, R), and out of the plugin back into the track (number on the righ, 1-4)—or following plugins.
You can select or de-select "pins" in the matrix to add, remove, or re-route channels in and out of the plugin. However, defaults are typically what you want to stick with.
Unused channels in the Plug-in pin connector
Note in the above image that the output of the plugin (right matrix) shows track channels 3 and 4 get no routing assignment. This is OK in the case of JS plugins, which will simply send silence out to tracks 3 and 4. These channels are unused anyway in the FX chain after the plugin does its processing, because it outputs stereo.
WARNING: If the above plugin were a VST, the behavior would be different! Because the plugin doesn't output anything to channels 3 and 4, VST behavior is such that the inputs 3 and 4 are forewarded to outputs 3 and 4. The stereo output in channels 1 and 2 are still a proper UHJ decode and can be used as such, but just know that there will be data on channels 3 and 4 that will need to be either silenced or discarded through routing down the processing chain.
Missing channels in the Plug-in pin connector
When adding a multichannel soundfile or a multichannel plugin to a track, the track channel count will automatically update to accomodate as many channels as is required by the soundfile or plugin. However, if you later change the channel count of the track to be less than the specified channel count in the plugin, the missing channels will not be routed into the plugin. This error will be visible in the pin connector button in the plugin interface:
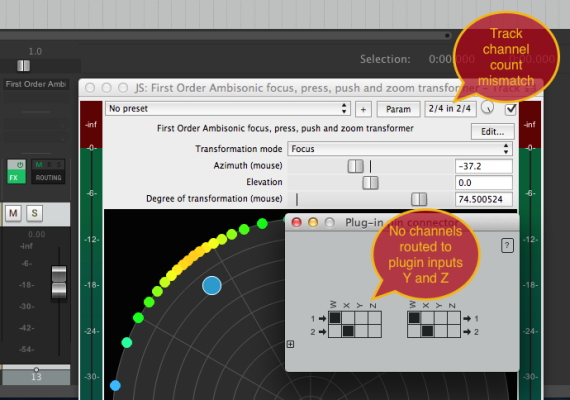
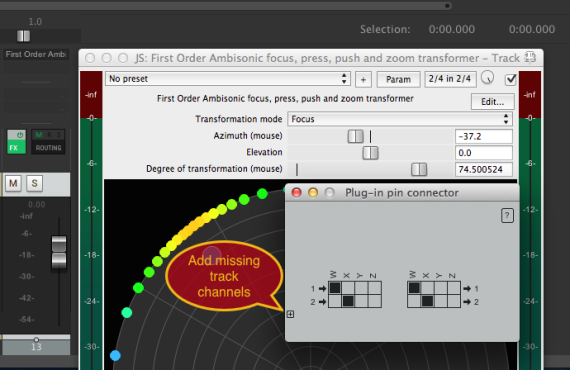
The in and out channel counts are indicated in the form of numTrackChannels/ExpectedTrackChannels. In this example, the plugin expects 4 channels in and out, but the track is set to only 2 channels. To correct this, you can change the channel count in the Track's Routing dialog, or simple click the '+' button on the pin connector matrix to add the number of channels needed for the plugin. Note this will also change the track channel count.
Tips and Tricks
Plugins
- Shift+Click on a plugin in a mixer track panel to bypass it.
- Option+Click on a plugin in a mixer mixer track panel to remove it.
Routing
- Shift+Click on a send (hardware or track send) in a mixer track panel to mute it.
- Option+Click on a send (hardware or track send) in a mixer track panel to remove it.
- Option+Click on the 'M' in the routing section of a mixer track to en/disable master/parent routing
Layout
- Resize a group of tracks in either the track or mixer window: Select tracks, option+resize one track in the selection.
- Resize all of tracks in either the track or mixer window: cmd+resize one track.
Envelopes
- Logarithmic (fader) scaling on envelope views: Preferences>Track/Send Defaults>Scaling for new volume envelopes>Volume fader scaling
- Change envelope volume range: Preferences>Envelope Display>Volume envelope range
- Double-clicking an envelope point sets it to the parameter's default value
Faders / Meters
- Change fader range: Preferences>Track Control Panels
- Reset meter peak indicators on play/seek (useful for resetting clipped meters autmatically)
- VU meters: change min/max meter values and update rate
- Volume/pan faders: change fader max/min levels
Playback
- No scrubbing sound with cursor seek: Preferences>Mouse Modifiers>Context drop down menu>"Edit cursor handle">set "Default action" to No action.