Software
Install this for your OS to run our Makerbot Replicator.
*ReplicatorG - http://replicat.org/
*Some sort of 3d design software capable of generating stl files (OpenSCAD, Solidworks, Rhino)
Design Your Part
Design your part with your favorite 3d package. I like Solidworks. Rhino will do in a pinch.
Check your Fit
Do a test print on a regular printer at 1:1 (full) scale. This is a basic check: do your on-screen units match real-world units? If you are printing something to mount a motor, sensor, etc. where you are aiming for specific dimensions and a fit, this is especially important. Print whichever views are important for your fit: top, side, front.
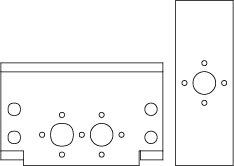
For instance, I am designing a pan-tilt servo bracket set (more here). I printed the top view of each of my two parts to check that the holes lined up, and to make sure the servo fits where it should. This is a quick alternative to an hour long print with some essential dimension off. Here is the .dwg I exported:
In Rhino:
- In the Top view, select your part.
- Choose Dimension->Make 2-D Drawing. This adds a 2d Drawing layer with an outline of your part.
- Do the same with any other parts you want to export.
- Highlight the 2d drawings and select File->Export Selected->AutoCAD Drawing (dwg). You should be able to open this in Illustrator or some other program and print it out. Be sure to check the proper unit/scale conversion when you open the file in another program.
- Maybe there is a way to print this directly in Rhino.
OK. It all checked out.
Export your Part as an .stl
In Rhino:
- Select your part.
- Choose File->Export Selected, "STL (Stereolithography) (stl)". Uncheck "Export open objects." This means your model will only export if it is watertight. Watertight is good for 3d printing.
You should now be able to open your STL file in ReplicatorG.
ReplicatorG
In ReplicatorG software:
- Open your .stl file.
- Position the part. Use the View, Move, Rotate tools on the right to orient your part, scale it (if it imports at the wrong scale) and lay it flat against the build bed.
- You want the largest flat surface of your part to be parallel to the bed and in contact with it.
- Generate your GCode. Gcode->Generate. This is a good time to preheat the replicator. See below.
- Estimate print time. Gcode->Estimate.
Makerbot Replicator
Steps to print with the machine.
- Turn on the machine. Power switch is around back.
- Preheat the printer. Using the little rubber joystick area around the glowing red "M", select Preheat. This takes a bit of time. Thank goodness you started while you were generating the gcode!
- Select the proper serial port and machine type in ReplicatorG.
- With your stl file and generated Gcode file open, click Build.
- ...
- Voila!
Changing Print Temperatures
Print Head Temperature
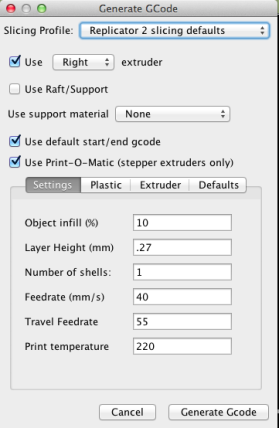
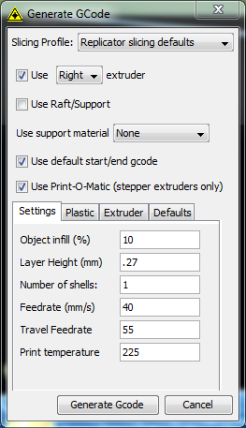
- In Generate GCode, change Print temperature to your desired temp:
Build Plate Temp
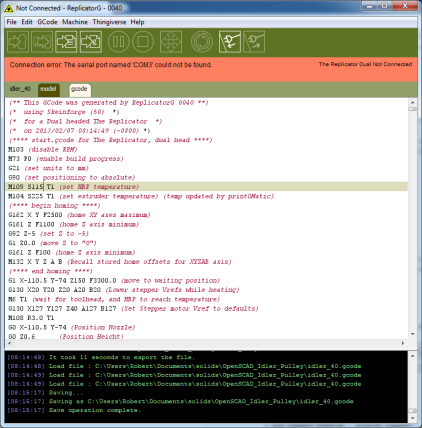
- This needs to be hand-edited in the GCode after it is generated.
- The text in the following image changes build plate temp to 115:
Recommended Print Settings
Quick and Dirty
High Quality/More Solid(?)
ABS Printing
- Use 225º for Print temperature, 115º for the build plate.
- Use default non-Accelerated settings.
- In Generate GCode, click on fourth tab, Defaults.
- Click Load Replicator Defaults.

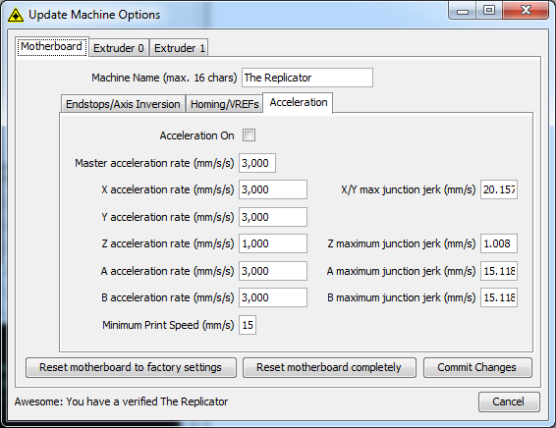
You need to turn off Accelerated build speeds on the Machine as well. You can do this when the machine is attached via USB.
PLA Build Settings
- 190 for print head, 60 for build plate.
- layer height 0.17
- use higher temperatures for accelerated settings (NOT RECOMMENDED)
Layer Height
- Default: 0.27mm
- For small, more finely detailed objects, go with: 0.15mm
Build Speeds
- Accelerated build speeds.
Default Replicator G Settings
These are the default settings if you select Replicator.
(Oh crud, maybe I selected Replicator 2, which we don't have, but it worked!)